Large Button Hole Foot – Accessory Of The Month November 2018


This foot works just like the standard 1-step buttonhole foot but larger. The button holder on the back of the foot takes a button from 2.5cm (1”) to 5cm (2”). The stabilizer plate holds and supports the fabric so it is very helpful in sewing buttonholes over the hem of thick fabrics. The buttonhole foot doesn’t just have to create holes for buttons, you can use this foot for other useful techniques to aid with your sewing projects.

This Accessory of the Month has a bonus project for you to make.

Download brochure here


Janome’s Easy Set Bobbin


Sewing 101 – threading comes before sewing.

Threading the needle on the sewing machine is pretty straight forward for most of us, it’s threading the bobbin that’s a bit tricky at times.


Front-loading bobbin

First on the scene were the front-loading bobbin style where you put the bobbin into a metal bobbin case before inserting it into the bobbin slot, which is usually tucked away behind the accessory box on the front of the machine

Front loading machines can be challenging for some but luckily the drop-in or top-loading style bobbins came along, giving you an added choice in purchasing a front or top-loading modern sewing machine.


Top-loading bobbin

Found in most modern sewing machines, top-loading bobbins are easier to remove and replace, with the added benefit of a transparent cover so you can see just how much thread is left without opening the machine.

Threading a top-loading bobbin generally involves 4 steps:

  1. Remove the bobbin cover plate. Place the bobbin in the case with the thread running counter-clockwise or form the letter “P” for Perfect.

     janome top loading drop in bobbin

  2. Thread through the flat tension spring starting at the first notch (1) and draw the thread to the left until it slips into the second notch (2). Pull out at least 4” of thread to use in the next step.

     janome top loading drop in bobbin

  3. Hold on to the machine thread (needle thread) while turning the handwheel to raise and lower the needle. This will pick up the bobbin thread – look for a little loop of bobbin thread just under the presser foot. Pinch this loop and pull gently to bring up the entire bobbin thread. Pull both threads to the back of the machine, under the presser foot.
    janome top loading drop in bobbin

  4. Pop the bobbin cover plate back on and now you’re ready to sew!

The top loading system is great… but can it be even simpler? Can we skip the hassle of step 3 completely?

Glad you asked because that’s the new Janome easy set bobbin.


Janome’s easy set bobbin

With the easy set bobbin all you have to do is to drop in your bobbin, making sure it’s in the correct counter-clockwise direction, pull the thread along the guides, then pop the cover back on.

Yup, that’s all there is – it even cuts the excess bobbin thread for you!


janome easy set top loading drop in bobbin

The easy set bobbin style is on the following models – MC15000QM, MC15000, MC14000, MC12000, MC9900, MC9450QCP, MC9400QCP, MC8900QCP Special Edition, MC8200QCP Special Edition, MC6700P, Skyline Series (S9, S7, S6, S5, S3), DM7200, Sewist 780DC, Sewist 740DC, DC6100, DC6050, DC6030, DC3200.

Janome Maker – Lisa Dopking


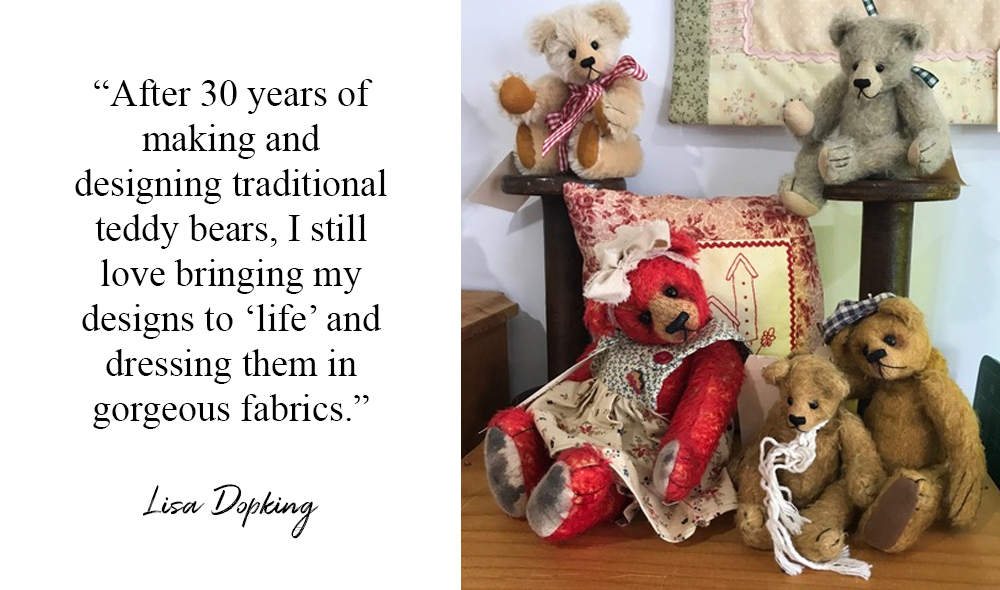
It all began for Lisa Dopking when she first discovered the wonders of teddy bear making in the mid-eighties. Over the years as Lisa perfected her bear making skills, her artist bears grew in popularity. It wasn’t long before she was asked to teach the craft, and make and sell patterns.

On our Janome Maker series today, the award winning maker shares with us her sewing experience spanning over three decades.


How did your sewing journey begin?

I first discovered the wonders of teddy bear making in the mid-eighties and started constructing them from whatever fabric I could get my hands on. A few years later in 1990, I walked into my first ever craft show. Stopping by at Gerry’s Teddy and Craft Designs, I was introduced to the new and exciting alternative of German mohair fabric and immediately knew I was in bear making heaven.

Having such an array of different fabric suddenly available provided me with the inspiration to make a traditional teddy bear from German mohair and the distinct lack of available patterns, only fueled my imagination and supplied the motivation to experiment with designing my own.

From there, I continued to perfect my bear making  skills and eventually began teaching a few friends. Soon I was selling my bears at local doll and bear shows as well as supplying several shops. As my artist bears grew in popularity, it wasn’t long before I was being asked if I sold patterns to make them.

Fast-forward a few years, and I now have a range of more than 40 bear making patterns. My work has been published both locally and internationally and I have won numerous awards for my Artist & One of a Kind (OOAK) Bears including a prestigious TOBY Industry Choice Award.

What do you sew or make these days?

These days, although I am semi-retired, I still enjoy teaching and conduct bear making and sewing circles 4 days a week (day and evening) for all skill levels, in my own studio at home.

I bought the Janome Quilt Maker Pro long arm quilting machine at the end of last year and am now thoroughly enjoying free motion quilting and using rulers on my long arm and loving the endless possibilities to explore. My only wish is that there were more hours in a day!

Where do you find inspiraiton?

My inspiration comes from the fabrics. Spend enough time with them and it is quite apparent that some fabrics actually do talk to you.  There seems to be such a never-ending array of gorgeous quilting fabrics continually arriving on the market, that it is hard NOT to be constantly inspired. Often I will see a single fabric or even a range of fabrics and instantly know exactly what I would like to make from them, surprising even myself!

I had a panda design in my head for years and then one day I found the right black and white German mohair. I went home and made the Panda in about 4 hours. It just worked out perfectly.

What’s a typical day like for you?

A typical day for me starts with doing most of the usual ‘mum’ things, like putting on a load of washing, and tidying up a bit. About 9am I let the dogs out the back door and I walk down the hallway and across the breezeway to my studio.

Three mornings a week I have craft circle classes which finish around 1pm and most afternoons are spent with a little bit of sewing, catching up on some paperwork and maybe some gardening. I do love my roses, just about as much as fabrics!

What are your future plans?

This year I have two main projects I will be tackling.  Apart from creating and launching my new website, I have also set myself the goal of becoming highly proficient on my new Quilt Maker Pro.

Your best sewing advice is…

The best sewing advice I think I could offer would be that there is no right or wrong way to sew. Work out what suits you best and create your own style.

Funny thing I found: I was interviewed in 1998 for The Australian Bear Creations Magazine and this was written: “When asked how much longer she sees herself being involved in the bear making world, the extent of Lisa’s commitment to bears is plain: “I don’t think I’ll ever stop making bears.” So true!


Follow Lisa on Facebook and her website.


Christmas Projects


Grab your holiday fabrics and sew your way through Christmas with our free projects.

Christmas Tree Plushie – Fast and easy to make project, it’s great for kids.

Christmas Tree Skirt – Sew a special touch for your Christmas tree with this easy modern tree skirt.

Folded Christmas Tree Napkin – why buy holiday napkin when you can make one with your favourite fabrics?

Free-standing Christmas Decoration – Hang them on the tree, leave them as ornaments, or use them as a gift tag!

T-shirt Dress – Start the holiday tradition of upcycling old T-shirts into new, fashion-forward wearable items.

Advent Calendar – Ready to start counting down the days to Christmas?

Christmas advent calendar

Edge Guide Foot – Accessory Of The Month October 2018


The guide on this foot aligns edges/seams of fabric so that neatly parallel edge stitching and top-stitching can be achieved with ease.

Using the red markings that are at 1mm increments on this foot will allow you to fine-tune the guide to the perfect position while staying effortlessly straight as you sew. The foot can be used in many different ways some of which include: measured seams, top-stitching, hems or even adding decorative trims to projects.

This Accessory of the Month has a bonus project for you to make.

Download brochure here


Janome Maker – Katrina Edwards


Katrina Edwards is hooked on machine embroidery, thanks to her Mother-in-law. She loves it so much that she started a YouTube page to help people around the world with Digitizer and Cutter software. Katrina currently teaches lessons in Shelock Holmes Sewing Machines Store and specialise in Janome MC15000, Digitizer MBXv5 and Artistic Edge Digital Cutter.


Tell us about your sewing background…

I was first introduced to sewing by my mother when I was 10; she had an Elna Lotus and I made Christmas gifts for our neighbours. But when I really got back into it after university, my grandma was a big influence as she was a second generation seamstress. So I guess it’s just in my blood.

I started out in the sewing industry back in 2006 when my family purchased a local art, crafts and sewing machine store in Gympie, Queensland. After being introduced to machine embroidery by my mother-in-law, I was hooked!

What do you make?

I like to create projects and tutorials based on built-in designs and stitches on my Janome Memory Craft 15000 and I’m also using Janome Digitizer MBXv5 to create my own patterns, which I then share on YouTube.

I find it interesting that people buy these beautiful machines and then are often frightened to use them to their fullest potential. I guess I just love to help people with their machines – they are such wonderful machines to use and I just love to share my knowledge with people to help them build confidence in their embroidery abilities.

Is your family supportive of your hobby?

Absolutely! I am very lucky that embroidery is a family affair in our home. My husband works in the industry and our children are very creative individuals. I love that I can go shopping with my 11 year old daughter and she will look at latest fashions trends and work out how we can create her own unique version with the tools we have in our studio.

Where do you find inspiration?

Pinterest, Facebook and peers in the industry!

I am a member of many groups on Facebook – I love to see what people are creating and get to know what issues they may have and how I can create a video or tutorial/project that would help them with their trouble shooting.

Also, I feel I pick up inspiration from all around me, my family, and my community too. I can often be out and about and see something in my surroundings and an idea starts to form in my head.

What’s a typical day like for you?

After I have finished the MUM tasks, I head into the studio and power up the computers. I have one just for my softwares (Digitizer and SimpleCut) and one for day-to-day stuff.

I start by checking emails and logging onto my YouTube channel to see if anyone needs any questions answered, and also thank my followers for their comments. Then I check Craftsy and spend time emailing each customer a thank you note for downloading my projects – I believe in showing the customer that I really do appreciate them. From there I look at what I have planned for the month and jump into my sewing.

What are you currently working on?

Like a true sewist, I have more than one project on the go.

Personal sewing – I am playing with leather and creating clutches and handbags that have embroidery on them.

Professionally – I am creating lesson plans for the Janome Digitizer MBXv5 software that I can bring to stores. I am working with Sherlock Holmes Sewing Machines in Boondall Queensland to teach classes on the software as well as Janome MC15000, as there is no store that offer this in Brisbane – I believe this will be very positive for the industry!

Your best sewing advice is…

Don’t be scared to be creative. I am surprised at how often I meet people who have purchased embroidery machine but don’t have the confidence to use them.

Follow Katrina aka Katty Kreations on YouTube, Instagram and her website.


Types of Needle Plates


Did you know that there are different needle plates for different sewing uses? Today we’ll cover the differences between each one.


The Standard Needle Plate

Janome includes at least one needle plate with every sewing machine. The standard needle plate with all sewing machines which have buttonholes or zig-zag and other decorative stitches.

The needle opening in the standard needle plate is an elongated oval hole which accommodates the side to side swing of the needle when stitching your machine’s widest stitch, which may be 5mm, 7mm or 9mm depending on your model machine.

In addition to the standard needle plate, Janome also has specialty needle plates, namely the Straight Stitch Needle Plate and the HP Needle Plate.


The Straight Stitch Needle Plate

The straight stitch plate as the name suggests, is used for straight stitching.

It comes with small round needles holes in the plate to prevent fabric from being pulled into the needle plate when sewing, particularly with light weight or fine fabric like chiffon and voile that are prone to getting pulled down the needle plate opening when using a standard needle plate.

The straight stitch needle plate also offers the benefit of a more stable base and support around the needle. When used in conjunction with the straight stitch foot, it results in perfect straight stitch formation.

Janome recommends using the straight stich plate when you’re doing patchwork piecing; free motion quilting; and machine embroidery plus drapes and bed linen where you have long straight seams.

An assortment of Janome’s computerized sewing machines have smart sensors to pick up on when a straight stitch needle plate is attached to the machine and will automatically gray out all stitches which are not compatible for the straight stitch needle plate.

Some of our machines come standard with this straight stitch plate. If not, there may be an optional accessory straight stitch needle plate you may purchase from an authorised Janome stockist.

The Janome 1600P-QC machine obviously comes with only this plate as it is a straight stitch only model.


The HP Needle Plate

While most sewing machines come with one or two needle plates – a standard (zig-zag) and a straight stitch needle plate –  some of our higher end machines comes with an additional needle plate and a special foot that goes with it.

The HP needle plate, along with the HP foot, is a professional grade system designed for accurate, high speed straight stitching.


Essentially it is a straight stitch plate with left position stitching. The left needle position and narrow configuration of the HP foot make for wonderfully smooth and exceptionally accurate stitching in lines or curves.  This is extremely useful for patchwork piecing when you want perfect, scant quarter inch seams; top stitching; and high speed straight stitching.

When the HP needle plate is inserted, the machine senses it automatically and will move the needle right where it needs to be – the left position that is!

You won’t be able to do any zig-zag with this needle plate on the machine as non-compatible stitches will be grayed out. This avoids having to worry about selecting a stitch type that might cause the needle to hit the foot and break the needle and damage the machine.

The HP plate and foot is compatible with only selected models including HMC15000 Quilt Maker, MC6700P, MC9400QCP and MC9450QCP.

Have you tried the Straight Stitch or HP needle plate? Visit an authorized Janome stockist to see the difference they make to your stitching!